How to Enable TPM in ASRock BIOS for Windows 11
On this page
ASRock boards are popular in value‑focused and small‑form‑factor builds, but their BIOS layout is a bit different from ASUS/MSI. If Windows 11 is complaining about TPM 2.0, you probably just need to enable fTPM (AMD) or PTT (Intel) in the ASRock UEFI.
This guide is dedicated to ASRock motherboards only: Phantom Gaming, Steel Legend, Pro4, ITX series, and more.
Understanding TPM on ASRock
On ASRock:
- Intel platforms usually expose Intel Platform Trust Technology (PTT).
- AMD platforms expose AMD CPU fTPM.
The options are normally found under:
- Advanced → CPU Configuration or
- Advanced → AMD fTPM Configuration / Trusted Computing
Step 1 – Enter the ASRock UEFI interface
- Power off your PC.
- Turn it on and repeatedly press
F2orDel. - You should see the ASRock UEFI splash screen.
- If you land in a simplified EZ Mode, press F6 to switch to Advanced Mode.
We’ll stay in Advanced Mode for the rest of the guide so all security options are visible.
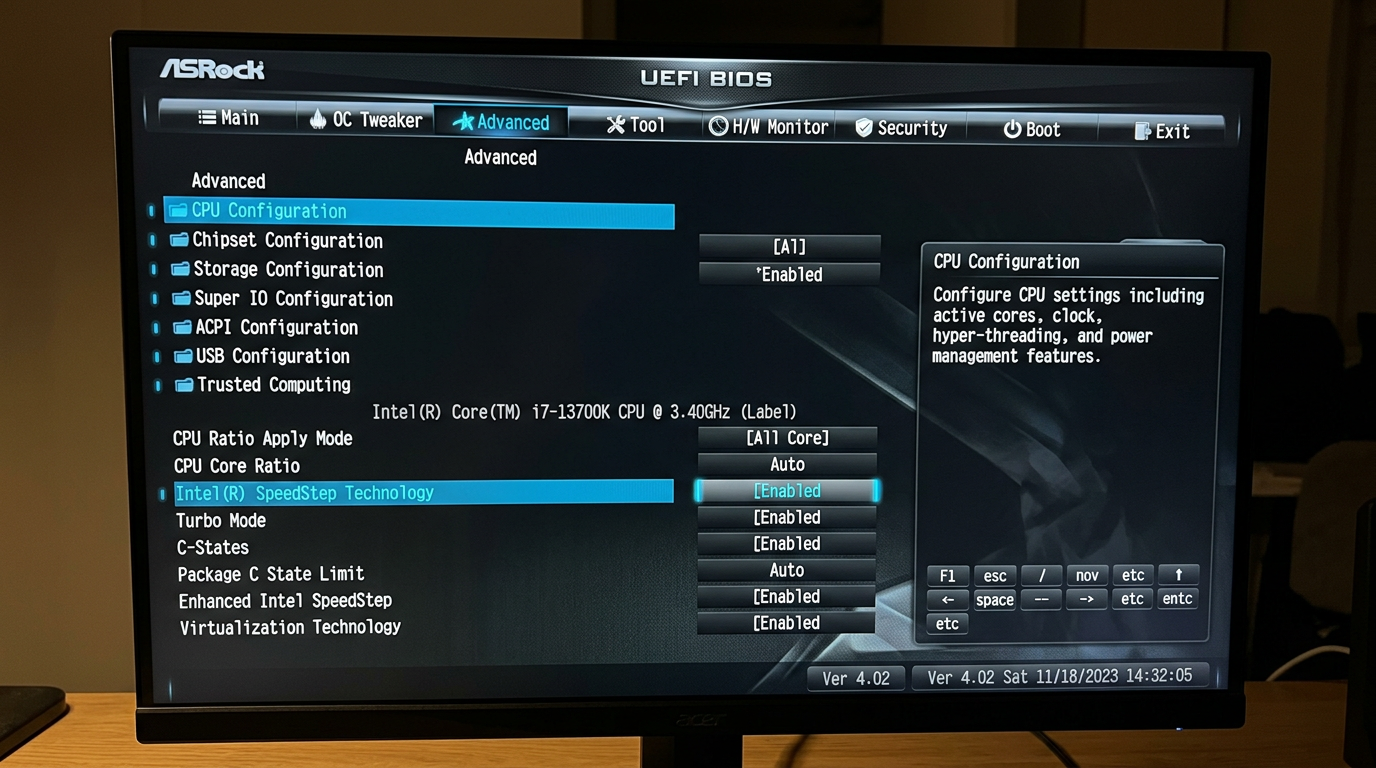
Step 2 – Enable TPM on Intel ASRock motherboards (PTT)
For Intel chipsets like B560/B660/Z690/Z790 from ASRock:
- In Advanced Mode, go to the Advanced tab.
- Open CPU Configuration or Trusted Computing (exact names vary).
- Look for Intel Platform Trust Technology or PTT.
- Set it to Enabled.
On some boards you’ll additionally see:
- TPM Device Selection → choose PTT or Firmware TPM
- Security Device Support → set to Enabled
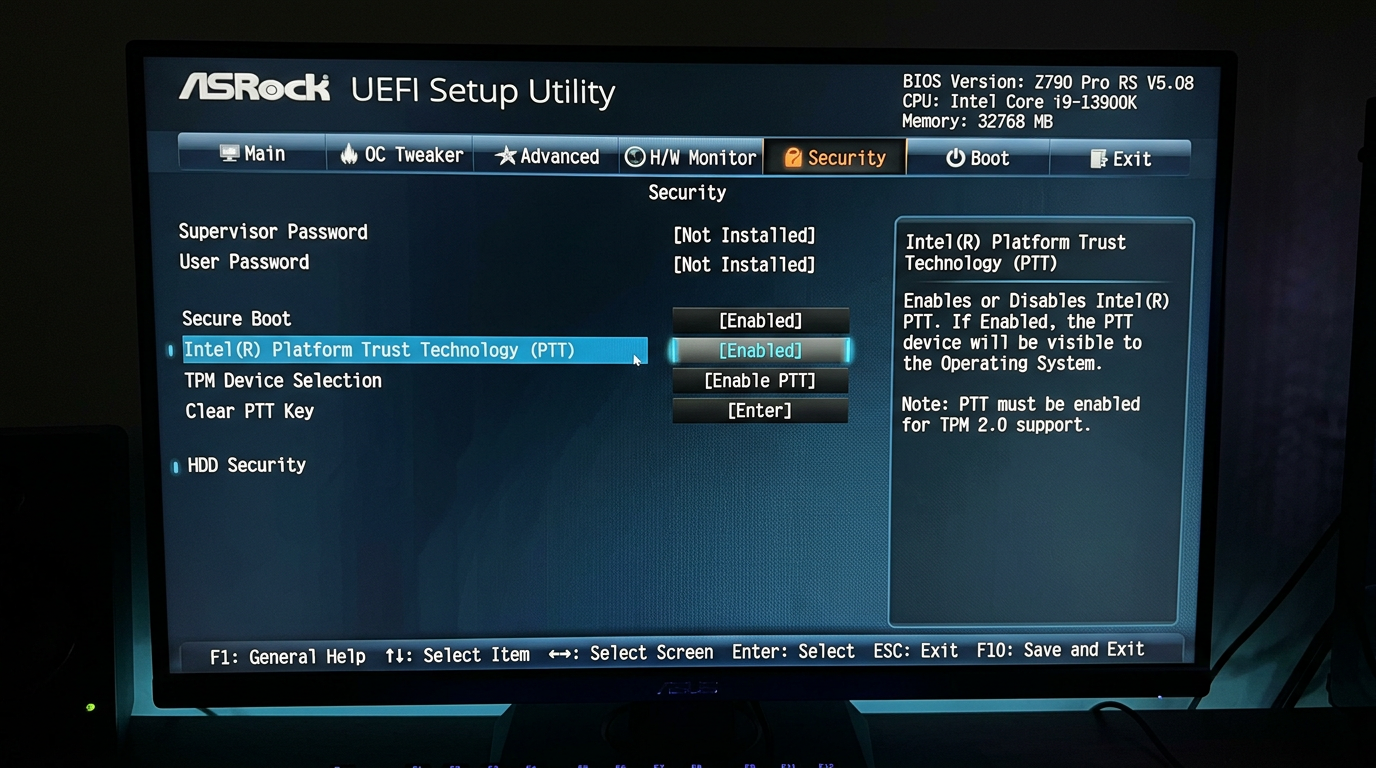
Leave any “Clear TPM” or “Clear Security Device” options alone unless you know you need to reset BitLocker/keys.
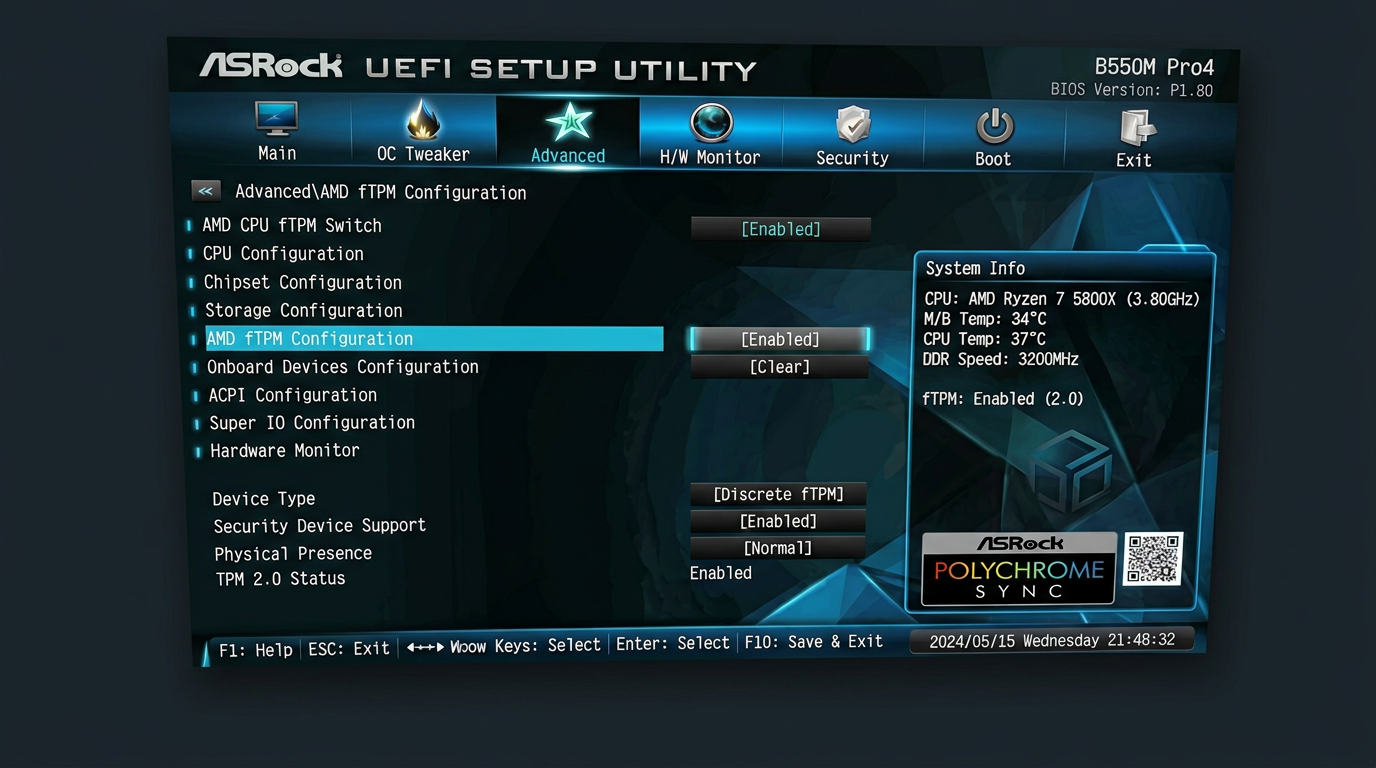
Step 3 – Enable fTPM on AMD ASRock motherboards
On Ryzen ASRock boards (B450/B550/X570/B650/X670):
- Go to the Advanced tab.
- Open AMD fTPM configuration, Trusted Computing, or occasionally CPU Configuration.
- Find AMD CPU fTPM or fTPM switch.
- Set it to Enabled.
If there’s a TPM Device Selection list:
- Choose AMD CPU fTPM or Firmware TPM.
- Do not choose dTPM unless you installed a physical TPM module.
Step 4 – Make sure ASRock is using UEFI with Secure Boot
Even with TPM turned on, Windows 11 wants UEFI boot and Secure Boot:
- In UEFI, go to the Boot tab.
- Check:
- CSM (Compatibility Support Module): ideally Disabled for full UEFI.
- Boot entries show UEFI: [drive name] for your OS drive.
- Go to the Security tab or Boot → Secure Boot:
- Set Secure Boot to Enabled.
- If there’s a Secure Boot Mode, choose Standard or Windows UEFI mode.
If disabling CSM stops Windows from booting:
- Re‑enable CSM so you can get back in.
- Keep TPM enabled.
- Plan to convert your drive from MBR to GPT later to fully move to a Windows 11‑style configuration.
Step 5 – Save your ASRock changes
- Press F10 to open the Save & Exit dialog.
- Confirm that:
- Intel PTT / AMD CPU fTPM = Enabled
- Any Security Device Support options are Enabled
- Choose Yes to save and reboot into Windows.
ASRock UEFI may briefly display a message about updating security devices; that’s expected.
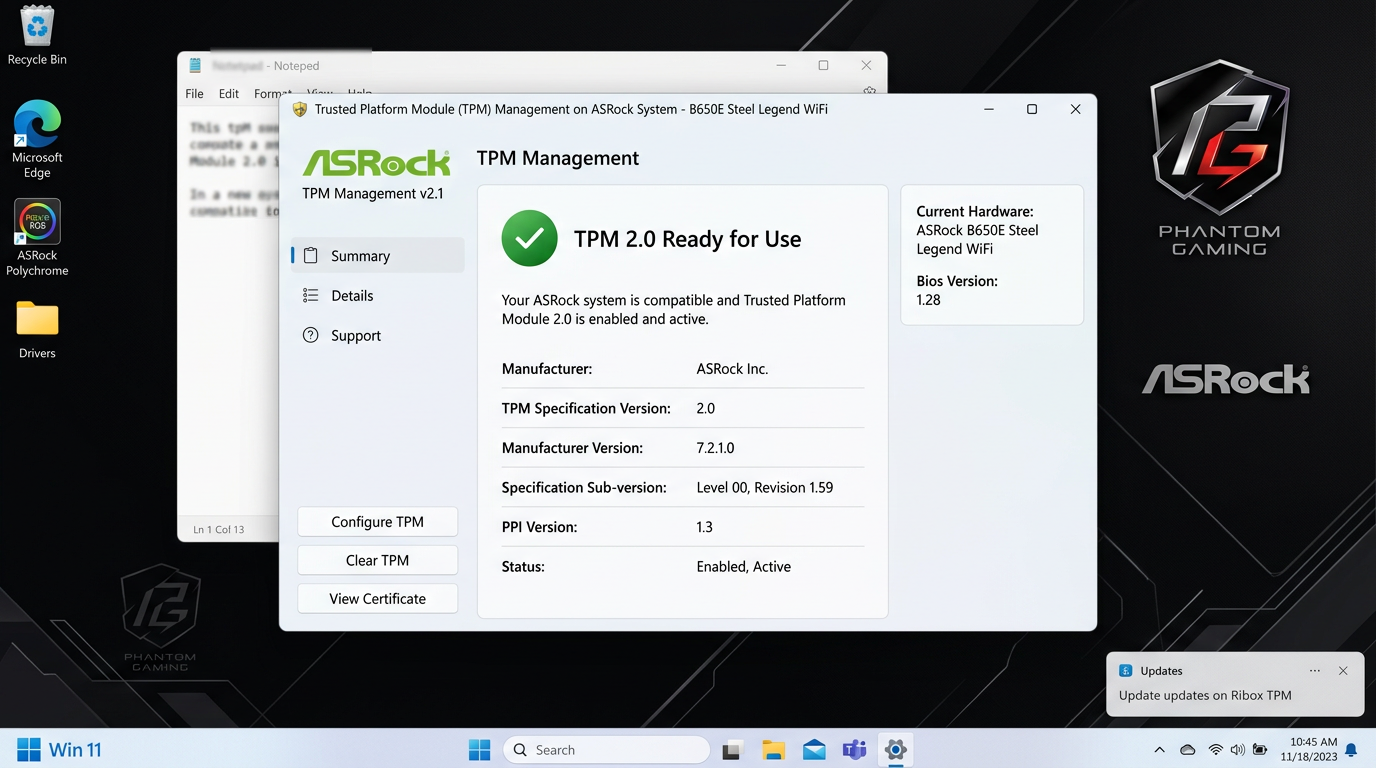
Step 6 – Confirm TPM 2.0 from inside Windows
In Windows:
- Hit
Win + R, typetpm.msc, and press Enter. - In the TPM Management window, check:
- Status: “The TPM is ready for use”
- Specification Version: 2.0
If it still reports that no compatible TPM is found:
- Re‑enter ASRock UEFI with
F2/Del. - Double‑check that PTT / AMD CPU fTPM is still Enabled.
- Verify you actually saved with F10, not just exited.
- Install the latest UEFI version for your exact board model from ASRock’s support site.
Model‑specific notes – Phantom Gaming, Steel Legend, ITX
ASRock Phantom Gaming series
- Typically groups many CPU‑related features under Advanced → CPU Configuration.
- TPM may be labeled as Intel PTT (Intel) or AMD CPU fTPM (AMD) directly in that submenu.
- Gaming‑oriented boards tend to have up‑to‑date Windows 11 presets; if you see a Windows 11 Ready or similar toggle, enabling it is fine but still verify TPM.
ASRock Steel Legend / Pro4
- Often simpler layouts, but still use the standard Advanced tab.
- Look for AMD fTPM configuration or Trusted Computing.
- If you came from an older BIOS, a firmware update may be required to expose TPM 2.0 controls.
ASRock ITX boards (DeskMini / ITX series)
- Space‑constrained systems that are very popular as compact gaming or streaming builds.
- Same logic applies, but menus can be condensed:
- Check Advanced first, then CPU Configuration for fTPM/PTT.
- Some DeskMini models require a newer BIOS to support full Windows 11 security feature exposure.
Will enabling TPM slow down my ASRock gaming rig?
On ASRock platforms, firmware TPM uses negligible CPU time once the system is booted:
- It doesn’t touch your GPU, RAM timings, or XMP profiles.
- It doesn’t run per‑frame work in your games.
- You should not see a measurable difference in FPS or input feeling in competitive titles.
If your focus is latency and responsiveness, combine this with:
- How to minimize input delay for competitive gaming
- The ultimate guide to timer resolution for gaming + Tier1Timer
Quick recap – ASRock TPM setup for Windows 11
For most ASRock motherboards:
- Intel:
Advanced → CPU Configuration / Trusted Computing→ Intel Platform Trust Technology (PTT) = Enabled
- AMD:
Advanced → AMD fTPM configuration / Trusted Computing→ AMD CPU fTPM = Enabled
- Boot & security:
- CSM = Disabled (when your drive is GPT)
- Secure Boot = Enabled, Windows UEFI‑style mode
- In Windows:
- Use
tpm.mscto confirm TPM 2.0 and “TPM is ready for use”.
- Use
With those changes, your ASRock system should pass the Windows 11 security checker cleanly, without hacks or performance‑killing workarounds.